Waggons West Etsy Shop

Friday, March 30, 2012

Happy Spring


It is going to be a crazy weekend and the probability of me posting, or getting anything much done is limited, so I am going to leave you with a picture I entered into the first Craftster photo challenge several years ago. I missed the peak for redbuds this year. It was so early and so fast, I had to just marvel at it. I hope you all have a lovely weekend and get a chance to enjoy the great outdoors!

Thursday, March 29, 2012

Robots!


Allow me a moment... this is the Raven Robotics robot that finished up on the second place alliance at the St Louis Regional for First Robotics. Spud three is on the team and can tell you exactly which parts he helped assemble or design, Dad is a mentor and Spud one did what he could to mentor from a distance. It was an excellent job by all.

Iron Craft 6: Peeps

I think I'm late posting my Iron Craft entry this week because it is soooo lame. I saw this absolutely adorable peeps bunting on Craft Gossip by Dana of Made on VandCo. (Whew! Hope I got that all right.) Of course I made it smaller than the pattern, reducing it by hand so they are totally lumpy to start with. I decided to use some scraps of fleece instead of pretty, well behaved felt. I made them as one layer rather than stitching them or stuffing them. I used a hole punch to kinda, sorta, punch holes in the generally right spot on their ears. And I made little tiny sharpie dots for their faces. I strung them all together on rat tail. LAME! The poor things are so embarrassed they all slide together as if to hide behind each other when I hung them up. In fact, one escaped. I swear I cut out 11 little bunnies, but only 10 made it on to the bunting. I don't know where he went. He is probably running around free someplace celebrating the fact that he wasn't strung up by his lumpy ears to be on public display for all to see. Or perhaps he is just making faces at the others from his hiding place in the WIP stack. (An awful lot of things have been able to hide in that pile!)

At any rate, here is my peeps bunting, made in response to this week's challenge on Iron craft. Head on over to Just Crafty Enough to see the absolutely amazing project created by all of the real Iron Crafters!


I should have stuck with my original project and submitted the sugar crusted chickens badges I've been making, but what is Iron Craft for, if not to stretch yourself and try something different?

Tuesday, March 27, 2012

Real Life


Real life is messing with my sewing and blogging time. So I will leave you with another picture from the 2010 Sunlight Project Quilt created by the Crossroads Quilters. Paintings by Twig. Quilting by Feather Touch Quilting. Sunpaint fabric (the pinkish and green patches) by festival attendees.

I am still looking for some one to take on the project for this year!

Sunday, March 25, 2012

Catching up: Wedding Reception Pictures

I was looking for pictures of the ribbon wall we made for my niece's wedding. I discovered that I posted them on Craftster.org but didn't have them here. So I am re-posting it here without any modifications.

My niece got married. I got to help with the decorations.

It is a long story but the theme was high tea in a sandcastle with beer. The food was pure Scottish high tea. The sandcastle was for the actual beach wedding. The beer was a special brew made by the father of the bride for the wedding and beer garden setting.


The sandcastles were wooden castles purchased from a chain craft store, sprayed with glue, coated with sand and sealed with clear coat. They held up amazingly well and really looked like sand castles.


The bride made the flowered hair clips in the picture.

A quick trip to the thrift store provided glass fish bowls to hold the sand, candles and shells sent from the bride's beach home.


There were fresh flowers arranged in beer bottles scattered all around the beer garden, including in the 'necessary' (a grand family tradition).

A bolt of muslin and a few yards of burlap provided the table cloths and runners. I did stitch hems in all of the table cloths. The bride and her friends cut the burlap. They had a bit too much fun, but it looked lovely.

We made tons of bows from the four rolls of perfectly colored ribbon we found at the thrift store. It was an amazing find. I turned down the aisle, looked up and saw them all sitting there in the perfect color for $1 a roll! The ribbon wall helped hide some of the business end of the brewery outside the beer garden.


I already posted the guest book. http://www.craftster.org/forum/index.php?topic=386958.0

and the croquet set http://www.craftster.org/forum/index.php?topic=382294.0

I forgot to get pictures of the tablecloth I made for the gift table. It has the same embroidery pattern as the purse I made for her. http://www.craftster.org/forum/index.php?topic=383849.0 I added their names and dates and a celtic heart to the center.

Oh... and what every good guest to a celtic wedding celebration should wear...

A utilikilt.

Forget what the mother of the bride was wearing... here is the lovely garb of the father!


One last thing... what does the mother of the groom do when the army won't let her son have leave to attend the reception? Why make an almost life-sized paper cutout of course. (Sorry I don't have a good picture of that.)

Saturday, March 24, 2012

Recruiting!

It is almost Earth Day. The folks at Greenway Network are getting ready to for a big festival season. And that means SUNPAINTING!

Here are some kids at a recent festival making their sunpaint fabric. We usually have HUNDREDS of kids come by and play with our paint and things. Most of them are able to come back and get their fabric to take home as a souvenir. Some don't make it back and some simply donate the fabric to the Sunlight Quilt Project.

You see, while the kids are painting with our volunteers, we are talking to their adults about the problems associated with invasive species. One of the biggest problems we have around here is bush honeysuckle. It is a huge problem because it crowds out the native plants that grow in the forest floor, creates pathways for predators to get to songbird nests and may even add toxins to the soil that prevent some native species from growing.


That brings us back to the pieces of fabric that are left over from our festival events. For the past several years, we have given the fabric to local quilt guilds. They have assembled quilts which we then raffle. The money raised goes to support our invasive species education and eradication projects. Last year we used funds from the Sunlight Project to purchase special tools called honeysuckle poppers. They make it easier to get the plant out of the ground. We have been using these tools at several removal projects throughout the Confluence Region.

You see, that is the origin of the Sunlight Project name. We use sunlight to paint the fabric and removing bush honeysuckle brings sunlight back to the forest floor.

It is time to get started on the project again. We are looking for a quilter or group of quilters who will be willing to donate their time and the extra materials (batting, backing, quilting) to make a quilt. We have some fabric available now and will have more at the end of April. We need to have the quilt ready for display before our annual Race for the Rivers event at the end of August. We start selling raffle tickets as soon as the quilt is ready and the drawing takes place at our annual meeting in late October or early November.

Let me know if you are interested in working on the project.

Friday, March 23, 2012

My First Quilt


Some little friends came to visit a while ago and so we got out an old suitcase full of dollies. It was full of clothes, many of them handmade by my mother and grandmother. Some of them are obviously baby clothes that I and my siblings wore. There were also several doll quilts from several generations. Unfortunately most of them had been damaged in a fire years ago. But in amongst the treasures was this wee quiltie. It is all hand sewn and stuffed with what feels like lumps of batting. It is the perfect size to cover my tiny tears doll. I'm not sure where my doll is, but I still have the quilt. It is the first quilt I ever made, sitting under the treadle machine while my grandmother stitched away.

Grandma had and electric machine. It was stored on the sunporch. She always used a treadle machine. It sat in the dining room window and overlooked the farm yard. She was always sewing something. When I was small, she would make dresses for everyone. Many of her sisters were much younger and then I was the youngest granddaughter. She would make matching dresses. I didn't get in on the earliest chains of dresses but I did get the same dress in multiple sizes on occasion. She also made pajamas. We always had the best pajamas in the world. The cutest kittens and clowns and other designs.

When she wasn't sewing, she embroidered pillowcases and crocheted lace trim. We all had our own sets. I had the cutest set of sheep and a set with pink clover. We used them! There are sets, fancy sets with flowers that were saved, but the ones I love the best are the ones I slept on every night.

She made 'fancy' quilts. She even entered one in the county fair. We have our embroidered and quilted baby quilts. She also made comforters. We always had comforters with heavy cotton or woolen batting, tied with wool yarn. Some were pieced some were whole cloth. They had flannel backs.

I had one comforter that was actually two sewn together. Mom tells me now that the two were too small so she sewed them together. Not end to end, they overlapped in the middle. There was a space, kind of like a tent. I used to crawl into it and pretend.

I don't think I really understood that there was such a thing as a store bought blanket until I was in my first apartment. I still didn't really get it, because for my whole life, if I wanted new bedding, I picked out the fabric, took it to grandma and she made me a comforter. She also usually managed to make a chair pad, a lap robe and a couple of little pillow covers to go along with it. I have beautiful sets in pale blue and pink and green.

She was still sewing when my husband and I were first dating. She always wanted fabric to sew. I took him to the store and he picked out the strangest collection of fabrics for her, black birds, pink hearts, red scissors, green patterns. I don't think my grandmother ever swore, but she had some spluttering words for how hard it was to put those fabrics together. It is a beautiful comforter.

Those were the special things she made. But she was always sewing. I have no way of beginning to count the things she made for charity. She made bibs and gowns for the nursing homes. She made lap robes and pads. She made them by what seemed like the hundreds. There was always something going. And she did it all on a treadle machine.

As a kid, I sat under the treadle machine, next to the East Lake cupboard and stitched away. That is unless there was a quilt on the frame. Then I sat under the quilt!

I'll have to root out some of these quilts and share some more pictures with you all. They really are beautiful.

Sharing my little story with the lovely folks who link up with Connie.
ogspot.com" target="_blank">

Whimsey Box

I received my first Whimsey Box this week. The materials are beautifully presented and the box itself is fantastic. I'm not so sure about the contents. Sharpies and Elmer's glue sticks are not exactly the sort of new, interesting craft products I had hoped to explore. However there are some papers and trims that I am already mulling over how to use. I think there is a 'leather' trimmed bag in my near future. I will be interested to see what next month brings.

Sunday, March 18, 2012

New Beginnings Final Edition


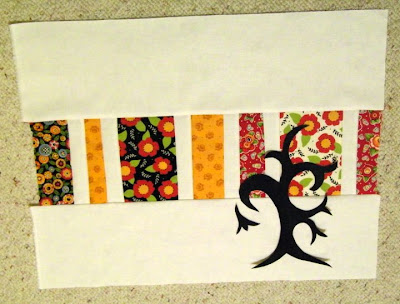
My New Beginnings Mini Quilt Swap project is finally finished and on its way. I am very happy with the way this quilt turned out. I am calling it Picket Fence. For some reason it just feels like I am looking through a picket fence to see the pretty flowers on the other side. The New Beginnings part of it is the little tree that is blooming where it is planted right in the fence row.


I really struggled with this quilt because I knew what I was going to make from the day I saw the announcement for the swap. You may recall seeing New Beginnings v.1. It is bright and green and orange and blue. I made the first prototype just to see how it would all work together. I really liked it and was ready to make one the right size for this swap. But then when I received the information about my partner I realized that the colors would NOT work. There was very little information available about my partner. In fact the only information I had was that she liked red, gold and black. I spent weeks playing with fabric and every time I knew what to do, it wasn't red, gold or black. Finally, I remembered some scraps I had from my ME quilt. I was able to pull the ones that were mostly red, gold and black.

I put together a simple stacked coins pattern using a slightly off-white kona. (The ME fabrics are a Mary Engelbreit design for Moda from a number of years ago.) I liked it, but I was still stuck on putting my sprouting tree on it. That lead to a long discussion with my mother and then a series of on-line posts and requests. The consensus was Tree!


Better yet, the lovely Buttoncounter on Flickr suggested quilting in black thread and adding leaves. That suggestion resonated and I finally could see my through to the end of the quilt.

This is a bit of a close up of the tree. I did it using the fused, raw-edge applique method. I stitched around it with a machine blanket stitch to make sure it was secure. Then I used a double strand of black quilters cotton to quilt around the tree.

Next came the leaves. They were a simple heart shape, again quilted in black cotton.


This picture shows the hand quilting. I came back in with the machine and stitched the straight lines for the picket fence with a white thread.

Here you can see the whole back of the quilt. I had to finish the machine stitching in a hurry since I was going to be leaving town for a few days and wouldn't have time to get it in the mail if I waited. It wasn't until I was taking the final pictures that I realized the last two lines I stitched were off and make the first perfectly square quilt I ever made look crooked. Sob! Oh well, It is just the pickets the dog uses to get in and out of the yard, right???

So Ta Da! My wee quilt is on its way to its new home. I surely do hope its new owner loves it. This one was very hard to part with.

Some final details. The quilt measures approximately 18 x 22 inches. It is made with a Mary Engelbriet design for Moda. The background and backing are Kona. The applique tree is a piece of black cotton from my stash. Quilting is a combination of hand and machine work. The binding is a black and white woven cotton check. It is hand stitched on the back.

Linky Party Tuesdays

Tuesday, March 13, 2012

Iron Craft 5: Buddy Can You Spare a Dollar?

The Iron Craft challenge for this week is to make a craft entirely from supplies found at the dollar store. Funny thing is, two weeks ago when Kat and Susi issued the challenge I know exactly what I was going to make. So who is waiting in the parking lot at the dollar store equivalent at 9 am this morning hoping they will unlock the doors early? Yep! Me!

Here are my treasures... 2 glass salad plates, 2 short, flat-topped glass candlesticks, one tall glass votive holder and one glass vase. The E6000 is part of my craft supply stash. (The newspaper that they used to wrap the glass happens to have an article on using books in art and furniture!)


The steps are pretty simple. Clean the glass to remove stickers and any residue that might interfere with the glue. Apply the glue to top rim of the candlestick. Center it on the plate or vase and let it set up. (When I made a large tiered stand for a wedding using beautiful thrifted glass, I carefully drew lines across the platters to find the centers. Placed the candlestick on the center and made small marks around the outside of the candlestick. I then cleaned off the marks that would end up under the candlestick before gluing. A better plan would be to make your centering marks on the top of the plate so you can wash them off after you are done! For this project, since the plates and vase are pretty small, I just eyeballed it.)

TA DA! A set of cupcake stands and a tall hurricane glass or jar for holding whimseys on the mantle!

Monday, March 12, 2012

My Favorite Cake

My mom has been visiting. We have been having all sorts of fun making things and cooking. Today we worked on a brick shirt for Spud 3 and she baked a cake. Not just any cake, my favorite oatmeal cake. It is a recipe she clipped from a magazine years ago. I have no idea what the source is. *

1 1/4 cup boiling water
1 cup oats
1/2 cup butter or margarine
1 cup granulated sugar
1 cup firmly packed brown sugar
1 tsp vanill
2 eggs
1 1/2 cups sifted all purpose flour
1 tsp soda
1/2 tsp salt
3/4 tsp cinnamon
1/4 tsp nutmeg

Lazy Daisy Frosting
1/4 melted butter or margarine
1/2 cup firmly packed brown sugar
3 Tbsp milk
1/3 cup chopped nuts
3/4 cup flaked or shredded coconut

For cake, pour boiling water over oats; cover and let stand 20 minutes. Beat butter until creamy; gradually add sugars and beat until fluffy. Blend in vanilla and eggs. Add oats mixture; mix well. Sift together flour, soda, salt, cinnamon and nutmeg. Add to creamed mixture. Mix well.
Pour batter into well greased and floured 9 inch square pan. Bake in preheated moderate oven (350 degrees F) for 50 to 55 minutes. Do not remove from pan.

For frosting. Combine all ingredients. Spread evenly over cake. Broil until frosting becomes bubbly. Cake may be served warm or cold.

Note, the recipe calls for half and half, Mom uses milk. The recipe makes a very tall cake in the 9x9 pan. Mom prefers to put it in a 9 x 13 pan. I will probably double the frosting recipe in a pan that size.


*As always if you know tell me and I will give proper credit.

Sunday, March 11, 2012

Your Opinion Please: To Tree or Not to Tree.


I've been thinking and drawing and re-arranging and pulling fabric and re-thinking my New Beginnings Swap quilt. When I first read about the swap and learned the theme, I had an entire quilt vision. I made the first draft which I shared here earlier. Then I received my partner. Pretty much the only thing I learned about my partner was that the colors I was going to use would not work. I finally pulled the colors she likes from my stash and pretty much hid everything else. A stacked coin quilt emerged similar to one I made a couple years ago. Stacked coins, a shiny bright penny, that could be a new beginning.

But I can't seem to get my original idea out of my head. It wants to grow on this quilt. So... what do you think? Stacked coins alone or add the tree? Please let me know!

A Quick Easter Purse


This is a quick pink purse made for my mom for Easter. It is her power color of what looks like a pink raw silk fabric. It is vintage, so I really don't know what it is. The lining is some more vintage fabric, probably from the fifties.

This purse measures about 9 x 6 x 2 inches. It has a stiff fusible interfacing. The closure is velcro. I didn't have a good color to match. The beige is my iron on. It didn't seem as if it was ging to stick well so it is reinforced with stitching. This one does have a pocket in the lininnng.

Saturday, March 10, 2012

StLMQG Meeting Today

What a great meeting today. The ladies of the guild provided an amazing amount of information about social media and quilting. I learned a lot of new things... but I am going to have to wait until I can lose a couple hours before I try some of them.

The pouch swap was fun. It was really fun to see all of the different styles and interpretations of pouches. I really enjoyed the fact that we got to hold and open and touch them all. It was so neat to see some of the designs in person. I looked a lot of pouch patterns on-line. I really couldn't understand some of them. Seeing them or at least similar ones in person made the directions a lot clearer.

I didn't get a picture of the BEAUTIFUL pouches I received from Jackie. They are absolutely amazing. The teeny tiny half square triangles are just incredible. I'll get some pictures up tomorrow. Thank you Jackie. I love them all! My mom loves them too. I am pretty sure that I will be one short when she gets on the plane this week.

Sadly I won't be there for next month (It is Mission: Clean Stream) but hopefully the challenge will be posted so I can join in. Thanks for a fun morning ladies.

Oh... the wee quilt at the top is another mug rug experiment. I received some luscious linen and that adorable long johns print. They are wonderful to work with. I'll be making several mug rugs out of those.

Some process notes on the mug rug.... I wanted to fussy cut while salvaging as much of the design as possible. I think I got a bit too much. The square should be a shorter rectangle. Given that, I think I need to make a wider strip on one of the sides to set it out a bit more.

Thursday, March 8, 2012

Whew! StL Modern Quilt Guild Pouch Swap


We have a secret pouch swap for the St Louis Modern Quilt Guild this month. My partner is a very talented lady so I have been stressing over what to make for her. Pouches are not something I make a lot. I've probably only made one or two before. I avoid zippers like the plague and I just don't seem to be able to make crisply sewn items.

This pouch is about 7 inches by 6 inches. It is made with a navy blue linen and a piece of sunpainted fabric. You can clearly see the stars and can just see the impression of a leaf on the upper left part of the stripe. It is lined with linen and has fusible fleece inside to give it some weight. The quilting is hand stitching with pearl cotton. I sure hope she likes it!

Wednesday, March 7, 2012

Top O'the Mornin'

I meant to post this yesterday. These are some pillows I made for St Patrick's Day last year. I sent a picture off to the folks at Embroidery Library (where the desings originated) and promptly forgot about it.

About a month ago, I received and email from them letting me know that they were going to be featured on their website on March 6.


You can see that here. How very exciting to be featured there. Thank you!

You may note that I use a lot of their designs, as well as designs from Urban Threads, an affiliated organization. These are from their Sunbonnet Sue and Fisherman Sam collection. I am not typically a Sunbonnet Sue kind of person, but I couldn't resist these Irish dancers. They are stitched on unbleached muslin. The border and binding are quilters cotton. They have an envelope style back so that they can be easily switched when the season changes.

These pillows are assembled like a quilt. The front and back sections are placed wrong sides together being careful to align the back sections so that they overlap. Then a standard 2" binding strip is stitched around the outside on the front just like putting a binding on the quilt. The corners are mitered in the usual way. The binding is hand stitched to the back and the pillow is done You get the look of piping without the stress of keeping the cording and fabric and panels aligned properly. I'll post pictures next time I am making some.

Monday, March 5, 2012

Now What?


I received this fabric in a package of fabric from a reputable fabric seller. As I was getting ready to cut into it I saw the writing in the selvage. "License is required for any use beyond individual consumption."

This is a fat quarter. There is no other information available to me. I have no idea of manufacturer, designer or anything. There is no way to figure out how to even ask for a license should I want to use it for a project to sell.

This is very disconcerting. I am used to seeing the rights reserved or copyright logo on things. I've always assumed that was for the design and that rightfully so, you could not reproduce the fabric or the design. I have no problem with that. But I am concerned about a manufacturer requiring a license to use their fabric when the odds are very good that you could get the fabric in a standard cut, such as a fat quarter, without the warning or as I did without any other identifying features. Is this standard on fabrics these days?

Does anyone know what this fabric is? Who made it? Who designed it? I am not going to use the fabric for anything for fear that the scraps might end up in a project for sale.

What do the rest of you think?

UPDATE: I wrote this in the comments but I think it is worth repeating here.

I respect the intellectual property of the designers. They deserve credit for their work. My concern isn't about the need to obtain a license to use the fabric, it is about the difficulty in doing so, particularly as it is clearly possible to obtain the material in a legal manner that does not have the necessary information.