Waggons West Etsy Shop

Thursday, June 28, 2012

Rocks


While looking for pictures for documentation purposes, I found lots of pictures of rocks.  Seems some one always grabs my camera while I'm 'resting my eyes' and takes pictures of rocks.  Very nice pictures of rocks, I have to admit, but rocks never the less. 

Tuesday, June 26, 2012

Fire Story


We anxiously watch the fires out west and keep our fingers crossed as they move closer to friends and family. We tell ourselves that the things don't matter.  That the lives of the firefighters come first.  That we will rebuild and it will be better.  Still we hope for the best and wonder how we came to be in this situation. 


When I was a kid, Smokey Bear was all the rage.  Only I could prevent forest fires.  I have the badge and doll to prove it!  We put out fires.  We manned fire watch towers, looking for the first wisp of smoke.  We papered the forest with reminders to not smoke and to put out fires completely. 


The National Park System (and probably the Forest Service) had a Let Fall policy.  All the trees that died and fell stayed in place.  In the sixties, the Yellowstone campground was a playground of fallen logs, stacked into mini cabins and teeter totters.  It seemed like a grand plan.  Keep Nature the way Nature was meant to be.


Unfortunately, Nature is not static.  In the high and dry Western forests it doesn't decay or rot into soil with any speed.  It dries and becomes highly flammable.  More importantly, many of the diseases that caused all of those trees to die are things that are susceptible to fire or smoke.  Stop the fires and the insects and parasites start to thrive and spread.


By the late seventies, you could see in many places in the West great swaths of dead pines killed by bud worm and bark beetle.  Entire mountainsides and canyons first with brown needles and then silent.  More fuel.  Some areas started to log out the dead and diseased trees.  They worked to contain the pests and salvage the forests.  Many of those sites now stand today lush and green.  Yet they continue to be threatened by the renewed spread of bud worm, bark beetle and dwarf mistletoe. 


What we saw in the eighties with the great fires in Yellowstone and today with the wildfires in Colorado and Utah is the burn off of all of that fuel. 

In the normal course of events, lightening would start a fire.  The wind would whip that fire through the forest, flaring off dead needles and dead trees, but not lingering long enough to do real damage to the trees.  The trunks might be scarred on one side but the other side would be find and the tree would survive. In some cases, germination of seeds requires or is aided by fire.  The brush  would be cleared, new seed would sprout and the forest would be renewed.  The ecosystem evolved with fire and fire is a significant part of it. 


But remember, we stopped the fires for years.  We effectively built up a huge stockpile of firewood in our forests.  Now when the fire starts it stays to burn up the fuel.  When the fire lingers it gets hot enough to burn the live trees.  The forest is leveled and the rejuvenation takes place in a much longer time frame. All of the reasons the wood doesn't decay (dry and cold) are the same reasons things grow slowly.  Recovery is astounding, but slow.


Add in the vastly increased number of homes, structures and lives that are now contained in those forests, to that fuel and we have a very big set of challenges.  While the natural ecology says we should let the fires burn, the human presence demands that we fight them.  It is a complicated issue and it isn't going away any time soon. 


So we pray for the safety of those putting their lives at risk fighting the wild fires, we hope for the best for those whose personal belongings are in the path of those fires and we look for ways to help those whose homes and businesses have already been destroyed. 


Thursday, June 21, 2012

Quilter's Fun and a Question of Choosing

If you don't already know about Michele's Quiltering Gallery, you should.  It is an amazing resource. I  found it while looking for local quilters.  She has literally thousands of links to quilting bloggers sorted by location.  I have found many new friends browsing through that section.


She also has a section called Quilter's Fun.  It has quilt-a-longs, swaps and the Weekly Themed Contests.  I love to join in the contests.  It is absolutely amazing to see the skill and creativity that are represented by the quilts that are entered. 

This week the theme is Embroidery/Stitchery.  I decided to enter my first embroidered, stitched quilt.  It is this Slime Mold quilt from the 2011 Mini Art Quilt Swap.  I LOVED making this quilt.


I love entering Michele's contests.  I don't have any expectation of ever winning.  My goal is to break into double digit percentages!   What I really enjoy is thinking about which quilt best fits the theme.  I spent some time today looking at images of quilts I have made that fit into the theme of embroidery/stitchery.  I actually had quilt a few that met the requirement.  Even looking at some of the ones that didn't, I could see how adding some stitching would enhance them. It is fun for me to imagine new quilts or re-imagine old works to fit the weekly theme. 


The one thing I really struggle with is choosing an image for the thumbnail that will accurately represent my work.  Is it better to show a long shot of the whole piece, an artful staging or closeup of the details most relevant to the theme?  I never really know how to choose so I usually pick my favorite picture and hope that it appeals to others. 


I like to think I am getting better at taking photos of my quilts, but it is a real struggle for me.  I am working between a small Nikon and an unwieldy Kodak.  I'd love to get a better camera but that isn't in the cards at the moment.  What I really need to do is work on lighting and staging.  That will work for future projects, but I am stuck with the limited photos I have of the projects that have long since sailed off to their new owners.  Like this wee quilt.  I am stuck trying to enhance what I have.


So...  how do you choose the images that represent your quilt on-line?  Are there 'tricks' or staging ideas that work better than others?  Do the quilt photo police have rules?  (I can't say I'd follow them, but it would be nice to know which ones I'm breaking.)  Let me know in the comments.  And in the meantime, be sure to check out all the cool quilts and features on Michele's Quilting Gallery. 

Monday, June 18, 2012

An Old Friend

  Many years ago, my niece spent part of the summer with us babysitting the spuds.  We were into making comforters and thought it would be a good idea for her to have one. (I say we, because in the early days, Mr Spud did all of the cutting and calculating for our quilts.  We worked on them all together.  He has a system for making these diagonal blocks with a strip piecing technique.  I'll have to get him to write it up someday. I don't really know how it works.  I just sew where he tells me on these.)

 She picked out the fabrics.  We pieced it and then she helped tie it. 

We have been staying in her old room for a visit.  She is in the midst of a rather chaotic move covering two islands, three states and I don't know how many houses and storage areas.  This quilt was one of the things that did not make it into the moving van.  We are going to be taking it to her. 


Seeing this old quilt was like coming across an old friend. This quilt is at least 10 years old.  It has been well used.  A few of the ties have come out but for the most part it is in very good shape.  I've always loved the fabrics and have a few treasured pieces in my scrap bin. 

It is also quite a revelation to see how far we have come from the first quilts we made.  The corners are less than square.  In fact, I have no idea how we stitched around some of them.  They are pretty wild.  Amazingly enough the blocks are mostly square and the corners meet fairly well.  All in all a decent quilt for our beginner status. 


Thursday, June 14, 2012

Hen Zen

Update:  I don't think I entered this in the Handmade Parade yet, at least I hope I haven't.  I try to make sure  I add a link, but being organizationally challenged, I sometimes lose track.  Katie and the folks posting on the parade are a real source of inspiration for me!  

I participated in the Mini Art Quilt Swap 5 on Craftster. My partner is the lovely WarpedHooker who made me the New York Foodie quilt I posted a couple weeks ago.

 WH's questionnaire  was intriguing.  She liked birds and tattoos.  She raises chickens.  I searched for images of chicken tattoos.  Most of them were cartoons.  I really liked this running rooster.   I was able to digitize it and stitch it out on the quilt fabric.  (Notice how casually I said I digitized it.  Actually that was quite a challenge and I am sure the professionals will find a number of mistakes. However, I am quite pleased with the fact that it came out as well as it did.)


As for the rest of the quilt, it was based on a scribble I made on some notes from a meeting.  (I doodle in order to stay focused on the discussion.)  I was trying to make some zentangles.   I have been told that they are excellent practice for free motion quilting.


Spud 1 saw my scribbles and said "Make that into a quilt."  I looked at it for quite awhile.  Thought about it for quite awhile longer and finally decided that it just might work.   Spud 1 wanted me to do it all by piecing or appliqueing black and white fabric.  I wasn't that adventurous.  I went to the stash and then to the store and found as many graphic prints as I could muster.


 I made a rough sketch of the large shapes in the doodle on newsprint. I then marked the sides that needed a seam allowance.  I cut that apart and used the pieces as my pattern.  I didn't get it quite right.  There were a few mismatches and funky seams.  I was able keep most of it to the edges where it was trimmed off.  Some if it required a bit of bonus quilting. 


Rather than try to piece the curved seams, I did a raw edge applique.  The circles were also appliqued onto the surface. I had the entire top pieced when I decided to go back and look at my partner's preferences.  That was when I realized that rather than liking neon colors, they are the one thing she really doesn't like.  That blue patch was originally a very bright neon green.  Needless to say the seam ripper came out and I patched in the blue piece. 


The bottom of the quilt called for some half square triangles.  I decided it would be easier to sketch out a paper piecing pattern and make them that way.  I think that it would have been much easier to do the HST's.  I kept at it and finally came up with a strip of triangles long enough.  I did find that after a paper piecing mishaps, I got the hang of it.  The last few went fairly well.  


This piece is entirely hand quilted.  There is a combination of two different sizes of pearl cotton and some quilting cottons.  Quilting this was a real challenge.


I eventually settled on trying to use quilting lines to mimic the zentangle lines.  There are definitely some flaws. I was trying to work quickly. 


Here you can see some more of the paper pieced section and the quilting around those triangles.  There is simple straight line quilting in the chicken wire piece.


I did all of the quilting free hand.  I didn't draw out any of the lines or swirls. It worked really well for the most part, but this one section was a real challenge.  I was trying to stitch in swirly zig zags and the fabric was just plain crazy.


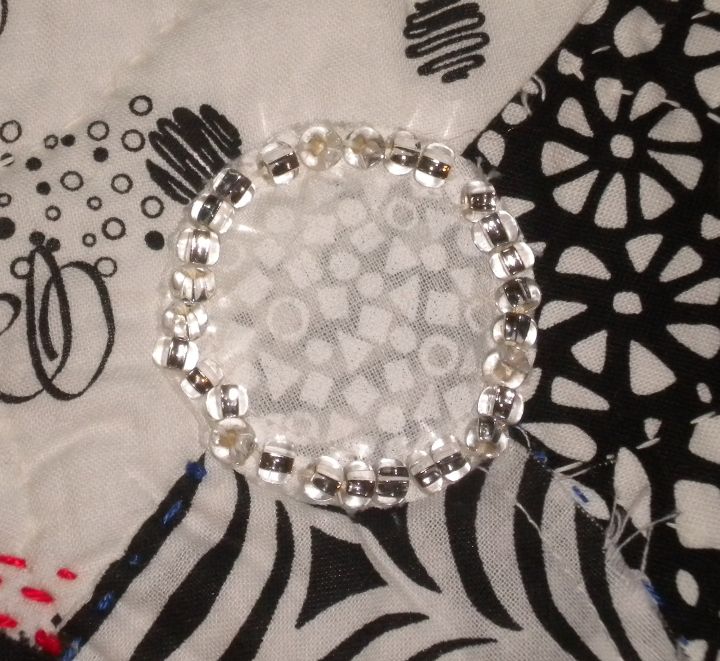
I thought I was done and ready to put the binding on when the circles insisted that they needed beads.  Well, this little one insisted.  Once it had beads, I had to add them to the rest.  Circles weren't too bad, but I also needed to add beads to the polka dot fabric.  That was more of a challenge.  I had to stitch each one separately.


I used a small bit of red in the binding.  It just needed it.  I really love how the quilting worked in this checked fabric. 


I added fast finish triangles for the hangers.  I probably should have put in a sleeve, but the little red squares were sitting on the table and seemed to be the right thing for the quilt.


 I stitched out a label for this, but I completely missed on the size.  The finished label was about 1/3 the size of the whole quilt.  So this one just has some writing on the back. The title Hen Zen comes from it's origins as a zen doodle.

This was a fun quilt to make.  I didn't actually measure it. It is probably about 24 inches on each side.  It is made with quilter's cotton.  The back is muslin.  It is machine pieced and hand quilted. 

Entered in the Aug 3 Handmade Parade


Wednesday, June 13, 2012

Props


A peak into what I've been doing over the past few weeks that has kept me from cooking, sewing and blogging.  These are some of the props for the photobooth. 

Another view.

Monday, June 11, 2012

Bringing People to the River

Hand made voyageur class canoe (built by Joseph Ringling.)
As most of you know I work for a non-profit that does clean water education, restoration, research and recreation.  Each year we have a clean water education and recreation program called the Race for the Rivers.  It will be at Frontier Park in St Charles, MO on August 25.  The purpose of this event is to raise awareness of our great river resources and to raise money for planting trees and cleaning streams.  This year we are working to bring voyageur class canoes to the festival to give participants free rides on the Missouri River.  It will be an opportunity for an up close and personal view of the river and to create a better understanding of our need to protect and conserve these natural resources. 

Unfortunately, given the economic condition at the moment, we are having some difficulty raising the funds to provide free canoe rides for up to 2000 people.  We have launched an fundraising campaign called "Bringing People to the River".    I am hoping that you will be able to assist.  Even if you can't toss a few dollars towards the project, you can share the link and spread the word about the project.  The more people who see it, the greater the possibility that we will reach our goal before our deadline in just under 2 weeks. 

Any help you can provide either through donating, linking or sharing the news will be greatly appreciated.  Thank you very much. 

Thursday, June 7, 2012

Quilting Circle


 I belong to a couple quilting groups.  One is a real guild with members and meetings and dues.  One is a relatively formal monthly gathering with a bit of structure.  And one is a group of young women (and me) who gather when we can to learn to quilt together.  This circle of friends gathers to share our quilting knowledge, our stashes and our lives. 


The group really started a couple years ago when one of the friends wanted to learn to quilt.  She really didn't need the group to teach her as she is a phenomenal artist and precise seamstress.  However, she thought she needed some help.  One of the more advanced quilters in the group decided we were all going to make the raw edge circle quilt  using the Cluck Cluck Sew tutorial. 


Personally, I thought it was a crazy quilt for a beginner and I joined the group letting them know that I wasn't going to make one unless I could figure it out using fabric from my stash.   As we met each month, first with fabric selections and then with blocks to rotate and arrange and play with, I got more and more intrigued with the pattern.  Through a rather strange, but typical sequence of events., spud 1 found an old box of fabric from the nineties.  It contained a number of WIPS and a stack of blue fabric I was collecting to make a science geek quilt.  It was an ah ha moment and I started to assemble my circle quilt.


 I used the embroidery function on my machine to do the circle quilting.  When it came time for the binding, I started looking for something to use.  I didn't have enough of any one fabric for it and at that time, I really hadn't seen a scrappy binding.  So I kept looking.  Eventually, I was in a quilt shop in a small town while on vacation looking for a rotary cutter I needed for a different project.  Out of the corner of my eye, I saw a bolt of the perfect blue fabric.  I grabbed it, bought enough to make the binding and stored it away until I returned home.  It was, in fact, the perfect shade.  I couldn't believe my luck in finding the right blue to match my 15 year old fabric.   When I finally started to cut into it, I noticed the writing on the selvage.  It was copyright 1995.  The same vintage as the rest of the fabric.  No wonder it matched. 

The circle continues as babies and families and other life events permit.  We've all made several quilts since that first project.  I think that we have all improved in some aspect of our quilting.    That group and this quilt are a treasured part of my life that is much richer for the chance to share the creative process on a very personal level. 

Tuesday, June 5, 2012

Meh

Having difficulty with my camera.  Trying to catch up with everything.  I will be back posting as soon as I can. 

Looks the the St Louis Modern Quilt Guild is having a charm swap this Saturday.  I can't attend... do you think it would work to sneak out for a couple hours right before the guests arrive for the big party?  Didn't think so, but it is VERY tempting. 

Still stitching away on a bunch of different projects.   Need to have a new ren faire sleeve by Saturday.  Have to ship a mini quilt that is over due and glaring at me without it's binding.  Need to get two other gift quilts ready to hand stitch before Monday. 

Saturday, June 2, 2012