Waggons West Etsy Shop

http://waggonswest.com

Monday, July 29, 2013

Independence


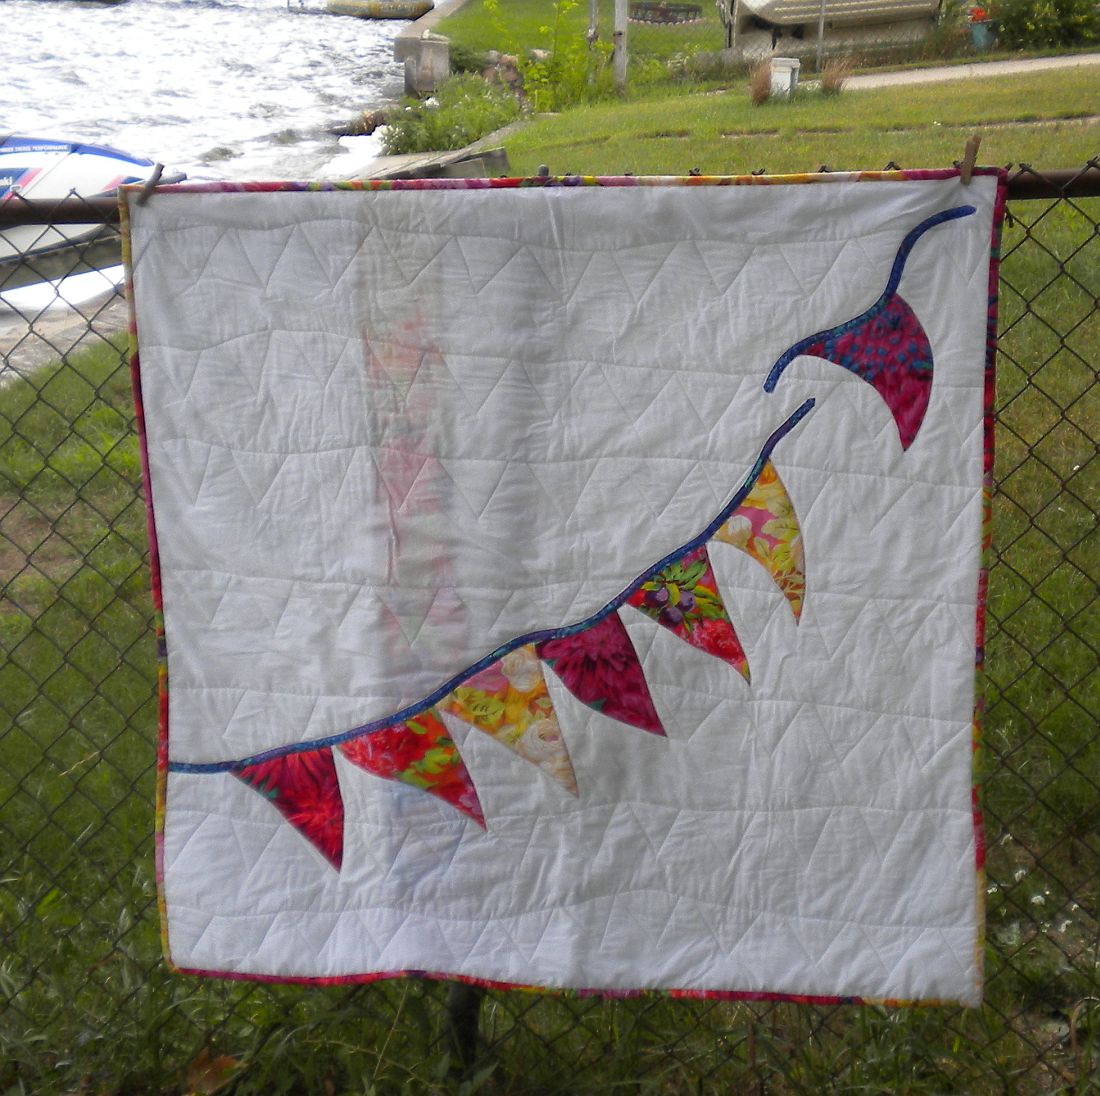
The July challenge for Project Quilting was to make a quilt inspired by Independence without making a red, white and blue quilt.


Thinking about it, I kept coming back to the notion of bunting that is so prevalent during the summer months.


I was intrigued by the notion of one of the pennants escaping, becoming independent if you will.


Thus, the Independence Bunting quilt.  I also liked the notion that the pennants were not traditional colors.  A little more rebellion suitable for the occasion.


The details.  This quilt is approximately 35x35 inches.  It is made of quilters cotton and muslin.  The backing is pieced and the binding is scrappy.  It is fused-machine applique and machine quilted.  The quilting is lines of bunting going across the quilt with a simple outline around the bunting.


Be sure to check out all of the other great quilts at Project Quilting.  And stop by Persimon Dreams to say hi to Kim and say thanks for inspiring so many cool quilts. 

Wednesday, July 17, 2013

Wee Quilts


I finally turned some of my Spring photography into wee quilts.


Images were printed on specialty quilt fabric.  (The blue in this picture and the one below is really purple.  Nothing I tried made it photograph purple.)


I was going to make one big wallhanging.


But the wee quilts appealed to me more.

 Plus they will each be going off to a special graduate soon. Shhh....  They might not read my blog but some of their mommies do. 

Indepdendence


The Project Quilting off-season challenge for the month of July is Independence.  But you can't make a red, white and blue quilt... so much for my blueberry and strawberry project.  This is my work in progress.  I actually have the quilting done and just need to hand stitch the binding.  I kind of liked the notion of the last pennant breaking free to fly on its own.  But then, I'm kind of strange that way. 

It is just about 40 inches square. 

Tuesday, July 16, 2013

Restored Kitchen


My sister is restoring her kitchen to the 1870's.  She has a few nods to modern conveniences: the cookstove is actually gas and the ice box is a real fridge.  But there aren't any counters or cabinets.  It is all furniture.  She is going to have some soapstone window seats.  They will need cushions.  Mom picked out the fabrics.  I have made some pillow covers and a the worlds most schizophrenic table runner you will ever find. 


Spud one and Bug the niece both HATE it.  One end is purple and mustard.  The other is green and mustard.  But the room is mustard and she wants purple dishes.   I figure she can always put a big bowl on the end that doesn't match today. 

Oh, the important thing.  These fabrics are a strong reference to William Morris, pretty much the dominant designer during the time her house was built. 

Monday, July 15, 2013

Adventures in Digitizing


I often offer custom embroidered labels or badges for prizes.  It is always fun working with customers to create something that is perfect for them.  This project was for a girl who won a custom label from Cara @caraquilts, the lovely host of #Talknt on Twitter every Tuesday night. 

RainbowR, doesn't quilt but she does do civil war re-enacting.  She suggested some historic silhouettes.  I did several different ones.  They were a lot easier than I had anticipated but it still took me a while to get them to the point where they were recognizable.  This is the final product for her.  I can't wait to see what she does with it. 

Sunday, July 14, 2013

Fun with Shirts


I finally got one of the 30% off coupons for Kohl's at a time when I actually needed to go to the store.  While I was there, I found a sale on polo shirts.  Just the thing I needed to get some birthday presents done while playing with my embroidery machine.  We started with this lovely dinosaur from Urban Threads.  My sister, the geologist, got one in turquoise.  Her husband, the geologist/brewmaster/vinter got wine on his.  My nephew has a Zombie.  Spud one had to have a vampire.  Spud two needed an Alabama A and DH had to have a Michigan M.  I had to digitize those two.  Mine is a lovely pink dragon!  Sadly, this is the only one for which I have a picture.  I'll have to work on that. 

Saturday, July 13, 2013

Dad's Shirt Had a Problem


So we made a bag out of it.


With an awesome stone lining courtesy of my friend Kelly.  I thought he might give me back my Morse bag, but it turns out he kept both of them. 

Friday, July 12, 2013

Hard to Believe


Spud 3 is going to be a junior this year.  He hasn't stopped wearing the Hawaiian shirts.  They are just louder now!


And these two are going places as well.  

Thursday, July 11, 2013

Morse Bag-o-rama


I always try to participate in swaps run by Leslie and Susan on Craftster.  They do such a lovey job organizing things.  More importantly their swap ideas are fabulous.  It is always swapping something that is fun to make and that everyone can be successful at so you know you are going to get a great gift in return. 

This time it was round two of the Morse Bag swap.   The Hello Kitty bag and mug rug were what I sent to my partner.  I added a bunch of matchbook notebooks for her kids.  She is big fan of Hello Kitty.  When I saw the fabric, I just couldn't resist.  I did a modified pillowcase burrito to get the edges all finished inside.  I'm still working on the tutorial but should have it posted soon.


 This is the lovely bag that Usdimama sent to me.  It is made of a luscious heavy weight cotton.  I pulled it out of the box and it was immediately claimed by DH.  The pin cushion is lovely.  The colors are very rich.  I really like how they are variegated in the stitching.  And that is a lovely deep red fat quarter, that unfortunately doesn't show up well in the picture.


My poor partner had a difficult time getting to the post office so the swap mama's sent me an angel.  Susan sent it on even though I had already heard from my partner before she finished.  It is absolutely gorgeous.  She found fabric designed by Malka Dubrawsky of Stitch in Dye.  Malka is one of my absolute favorite fabric idols.  Her release and over-dye techniques are incredible.  To have a bag made from her fabric, which I've never seen in person before, is an absolute treat. 

 But wait!  There is more.  She sent me an altered tin containing my very own mini nini.  How awesome is that?  I LOVE it.  DH tried snagging that too but I wouldn't let him! 

A giant thank you to BOTH of my Morse bag makers. 

Wednesday, July 10, 2013

On the Work Table Today


I have been running low on sunpainted shirts.  Spud 1 sells them all at a show in November.  I haven't been taking them to shows.  I end up trying to make them in October when the leaves are tough and drying.  Not such a great plan.  Now that I have a bunch of trimming to do in the yard, I have gotten the shirts out and am working on getting 'normal' sizes for November and baby shirts to re-stock the brick and mortar shop that sells them.  If I get ahead, I'll put some in the etsy shop. 

It isn't impossible to find plain onsies in garage sales and re-sale shops but it is almost impossible to find plain white t-shirts in adult sizes to upcycle.  I might have to break down and buy some new ones.  That will be a challenge for me. 

Thursday, June 27, 2013

Oh Where or Where has My Camera Gone?

Oh where or where can it be? 
With its SD card full
and it fancy lens on
Oh where oh where can it be?

Yep.  I can't find it anywhere.  Sigh. 


So you get lovely cell phone pics of my latest adventures in digitizing.  Yes!  A sock monkey.  Still too big for a badge, but I am working on it. 

Thursday, June 20, 2013

Conservatively Cutting Fabric for a Morse Bag.


This is the Morse bag I made for a swap on Craftster.org.  

A Morse Bag is one of the easiest bags to make.  Its simple construction is accessible to the beginning sewist. This makes it a perfect project for learning new techniques.  Best of all, everyone appreciates a unique shopping bag.  You can practice all you like and not be overwhelmed with finished projects

There are tutorials for making the basic bag all over the internet.  The original Morse bag site is here.  Leslie of Leslies Art and Sew has a great tutorial here as well.  Her pictures are most helpful.

The classic Morse bag calls for two pieces of fabric that are 18 x 20 inches and two handle pieces that are  4 x 18 inches.  These pieces can be cut from any fabric, tablecloth, sheet, old clothes or whatever you have on hand.  When upcycling you can create a paper pattern or simply use a ruler and washable marker to draw the shape on the piece of fabric. 

The following diagrams will help if you are going to be making your bag out of yardage.  They are mapped out to conserve as much fabric as possible.  The final piece won't be exactly as called for but the pattern is flexible enough that they work.  I will show the necessary adjustments in later tutorials. 


If your print runs with the grain of the fabric (double arrow), you will need 20 inches of fabric.  Purchase 5/8 yard of fabric that is 44 inches wide.  Trim it to 20 inches along the fold.  Trim the selvages.  Cut at 18 inches from the fold and then cut along the fold.   (You don’t have to cut along the fold.  You can leave the fold intact, eliminating one of the French seams.  It is a matter of personal preference.  All of the directions from here out will assume that you have cut the fold.)   You will have two strips of fabric left that are close to but likely less than 4 inches wide by 20 inches long.   The original pattern calls for strips that are 4 inches by 18 inches.  You will be able to adjust for the width when you sew the handles.  You can trim to 18 inches if you like but the extra length is fine and this eliminates waste. 


If the pattern is perpendicular to the grain of the fabric (double arrow) you will need to purchase 2/3 yard of fabric 44 inches wide.  Trim it to 22 inches along the fold.  Cut at 18 inches.  Trim the 18 inch piece to 20 inches  (trimming off the selvage edge).  Cut along the fold to make two pieces.  (Again you can choose to leave it intact and eliminate the French seam along the bottom of the bag.)  Trim the selvage off and cut along the fold of the 4 inch strip.  This leaves two handle pieces that are 4 inches by about 22 inches.  You can trim these to 18 inches if you wish.

At this point you have all of the pieces necessary to assemble the classic Morse Bag. 

Sunday, June 2, 2013

Fabric Swap


I joined the fabric printing swap on craftster last month.  I was a little hesitant to put my sunpainting in with the real fabric printers.  However, I went ahead and had a blast making fat quarters for my partners. This is the piece I made for my partner goatgoddess. 

 Here is a close up of a section where you can see the jumping sheep and goats.  It seemed appropriate to include a few of my billy goats on her fabric.  She has received so I can post some pics here.  I'll post the other pieces once they arrive at their destination.

I am wondering if I should start offering some of these pieces in the shop.  What do you think?  Any interest in some sunpainted fabric? 

Friday, May 31, 2013

Fabric Swap!


Take a look at these fantastic fat quarters.  I received them from Abbeeroad in the craftster fabric printing swap.  They are gorgeous. 

Monday, May 27, 2013

Memorial Day 2013


Picnic and party all you like but take one moment to reflect and honor those who have given so much.