Wednesday, November 30, 2011
Stuff and things
I have lots of things to write about and no time to do so. I missed the Iron Craft Challenge to make a wreath this week, a project I actually need to do. You should head over to Just Crafty Enough to see the absolutely amazing stuff the Iron Crafters have come up with.
Tuesday, November 29, 2011
Russian to Make Tea
This was a submission for the Carnival of the Recipes... I am re-posting it here in the interest of collecting my recipes spread across the intertubes into one place.
The deadline fast approaches and I MUST submit a recipe. I’ve pondered long and hard and thought about all of the things I’ve made using tea or coffee. I then thought about the things I’ve made for which I have fond memories. (I can recall several “OMG what is in this?” and “You call THIS coffee?”). By now you can probably tell I’m not much of a coffee or tea drinker. I like my caffeine with some carbonation and phosphoric acid.
When I do make tea it is for tea parties around the fire. I always use Red Rose brand (decaffeinated for the kids). I have one of those lovely teapots with a candle to keep it warm. I prefer lemon. (I can hear the groans from my elegant tea-drinking comrades starting in on everything I am doing wrong. But I’m not going to care about that.) For tea, the coffee table is spread with whatever tidbits and goodies we can pull out of the pantry and freezer. There is usually a cheese tray with a good cheddar and probably a havarti. There are good crackers. Sometimes there is bread with artisnal balsamic and olive oil. Sometimes there is bread with homemade jam. Some times we have an assortment of deli meats, roasted peppers, and marinated veggies. Fruit and veggies are often found. (Some of my littlest friends love strawberries and cherry tomatoes and we hate to disappoint.) There are always pistachio nuts and cookies. Any sort of cookie you want to make or buy. I’ll share some of our favorites at another time as I see from the little clock on my screen that I now have even less time than before.
Tea. At any rate. I’m not a big tea drinker. I didn't like it much as a kid until I was sick one year. My best friend and neighbor would always bring a chicken pox box, the invention of one of the neighborhood moms to save the sanity of another mom during an extended bout of chicken pox. Since I was a bit older than the traditional crayons and coloring book my friend included tasty treats. One of them was Russian Tea Mix. (Fingers in ears trying desperately to ignore the screams from the tea drinkers.) I don’t know if I’d drink it these days but my kids would. It is a fond memory and now I am going to share it with you.
Russian Tea
2 cups sweetened lemon tea mix
1 1/2 cups Tang
1 tsp cinnamon
1 tsp cloves
Mix together. Store in airtight container. Put 2-3 tsp in a mug. Add one cup boiling water. Stir. Sip. Enjoy.
I usually go light on the cloves. You
can use 1/4 cup tea mix and 1 1/2 c lemonade mix if you don’t have the flavored tea.
Monday, November 28, 2011
Crazy!

Sure hope all you folks in the US had a wonderful Thanksgiving Holiday. Sometimes it is hard to list the things for which we can be thankful. I took the time to get away and reflect a bit. In the course of my travels I saw a deer by the side of the road. It was in the same place I saw a deer many years ago when I was taking another much needed time out. For some reason, the sight of that deer at those times was all I needed to refocus my energy and figure out how to move forward. It was a break from all the crazy going on around me.
And just one part of the crazy right now is making CRAZY hats. I am making them for the Golden City Brewery. If you haven't been to the Second Largest Brewery in Golden, Colorado, then you need to find the time to visit. It has been repeatedly voted the best beer garden in Denver. It is a beer garden that is open all year round. Even in the snow. Lots of snow. Enough snow to dilute a good pint. That is where the hats come in. The crazy hats. They are the official hat of the Golden City Brewery. And I get to make them.

These hats are made out of two layers of fabric. They are very warm. Boy blacksmith and I had a blast picking out the craziest fleece we could find during the holiday sales. A few of these hats will be available in my shop for folks who are missing their Mad Molly's Brown or Cherry Bomber. I have special permission to use the design to make a run of non-GCB hats too. The first Zombie Survival hat is there today.
Thursday, November 24, 2011
Pecan Pumpkin Cake Pie
Hope that you all had a wonderful Thanksgiving. Since it was just us this year, we missed traveling and bowling with frozen turkeys and two meals in one day and a table full of desserts. I had to make something, but deciding between pumpkin pie and pecan pie and spice cake and all the other choices was too hard so we settled on the pecan pumpkin cake pie. Variations on this theme can be found all over the internet. The version I used is from Betty Crocker herself. It is a great compromise to make one Thanksgiving dessert that covers all the bases!
Mix the pumpkin, milk, eggs, sugar and spice mix in the mixer. You could probably do this by hand but watch for lumps. Pour into the baking dish. It will be runny.
Sprinkle the cake mix on top. Put the pecans on top of that. Slowly pour the butter over all of that. Make sure you distribute the butter and don't just pour it in a pool in the middle. Sprinkle some more spice on top of that. Bake at 350 degrees F for 50 - 60 minutes.
*I am baking mine in my microwave using the convection function. I put it into an 8 x 12 inch baking dish. It was full but not quite overflowing. Both the cake and the pie were thicker than would be expected in a larger pan but it was yummy never the less.
I have no idea what the additional pumpkin pie spice is for or why you would desire it. If I were to use it again, I would probably add it to the cake mix. I would also be likely to try for a caramel or spice cake rather than the yellow cake.
1 can (15 oz) pumpkin (not pumpkin pie mix)Start by melting the butter. (I forgot to do that!) Oil, grease, spray or just melt your butter in a 9 x 13 baking dish*.
1 can (12 oz) evaporated milk
3 eggs
1 cup sugar
4 teaspoons pumpkin pie spice
1 box yellow cake mix or spice cake mix
1 1/2 cups chopped pecans or walnuts
3/4 cup butter or margarine, melted
Whipped cream, if desired
Additional pumpkin pie spice, if desired
Mix the pumpkin, milk, eggs, sugar and spice mix in the mixer. You could probably do this by hand but watch for lumps. Pour into the baking dish. It will be runny.
Sprinkle the cake mix on top. Put the pecans on top of that. Slowly pour the butter over all of that. Make sure you distribute the butter and don't just pour it in a pool in the middle. Sprinkle some more spice on top of that. Bake at 350 degrees F for 50 - 60 minutes.
*I am baking mine in my microwave using the convection function. I put it into an 8 x 12 inch baking dish. It was full but not quite overflowing. Both the cake and the pie were thicker than would be expected in a larger pan but it was yummy never the less.
I have no idea what the additional pumpkin pie spice is for or why you would desire it. If I were to use it again, I would probably add it to the cake mix. I would also be likely to try for a caramel or spice cake rather than the yellow cake.
Wednesday, November 23, 2011
Toffee Grahams

The following recipe is from Cooks.com. It is one of the easiest cookie/candy/confections you can make. I've pasted it verbatim below so that I can keep track of the recipe. As usual, my notes follow.
24 graham cracker sqs.3/4 c. packed brown sugar
Dash of salt
3/4 c. butter
3/4 c. chopped pecans
Line a 15 x 10 x 1 inch baking pan with foil. Arrange graham crackers close together in a single layer. Combine butter, brown sugar, and salt in small saucepan; cook until mixture is blended, stirring, for about 1 to 2 minutes. Add pecans; spread mixture over graham crackers. Bake in 350 degree oven 10 minutes or until bubbly; cool 10 minutes. Cut each graham cracker in half and remove to a cooling rack. Serve cold.

Do not skip lining the pan with foil. Use easy release foil or oil your foil. This is STICKY and it won't come out of the pan if you don't line it. Set the graham cracker squares on the foil before you start the rest. Have the pecans measured and ready to go.
I made sure that I brought the sugar and butter to a boil. That eliminates some of the liquid from the butter and blends both of them together better. Boiling it does make it a little harder to spread over the crackers. I use a silicon spatula and move it around.
The next time I make this, I may add cinnamon to the sugar/butter mixture. Another option might be to sprinkle chocolate chips on the warm cookies and spread them out after they melt. I think that there are a lot of possibilities for changing this up. Leave a comment below if you have a favorite version.

I'm showing my age today. As I was typing Toffee Graham, I kept imagining that very old Saturday Night Live skit with the Candy Graham delivering land shark. I think these bars might just be as lethal.
Tuesday, November 22, 2011
Sunpainting Tutorial: Painting on Fabric General Instructions
 Sunlight Project Quilt 2011
For many years, I have been doing sunpainting. I started out using the Pebeo setacolor sunpaint fabric paints. First a brief history...
Sunpainting was discovered in an island setting where they left some dyed fabric out to dry. While they were gone, a palm frond fell on the fabric. When the frond was lifted off of the dry fabric, the image of it was left behind. The technique is simple. The results are beautiful and unpredictable. What follows are basic instructions for sunpainting.
 Step 1
Select your fabric. One hundred percent cotton works best but you can get good results with blends and other fibers. You will probably want to test your paint and fiber combination before you commit to a big project with it. Dampen your fabric. Lay it out on a plastic or other waterproof surface. Old shower curtains and vinyl tablecloths work well as do garbage bags, vegetable bags and shopping bags. Smoother surfaces typically result in sharper prints, but wrinkles in the plastic can also add interest to the final product.
Step 2
Mix your paint. The process requires a fairly dilute paint no matter what brand you are using. The traditional translucent fabric paints are already thin so a 2 to 1 (water to paint) dilution is a good starting point. (Always read and follow the directions on the bottle for optimal results.) Craft paints and opaque fabric paints tend to be thicker. They should be diluted about 3 or 4 to 1 (water to paint). It isn't rocket science. You do not have to be precise. The only problem you will encounter is getting it too dilute. Even then you can still work with it. NOTE: It is called fabric paint because it is used to paint fabric. That means it will paint any fabric including what you are wearing. Trust me. I know. I have a special set of clothes I wear when painting. They didn't start out that way, but it is probably OK to wear your favorite comfortable horribly stained shirt while you are doing something you love to do. Right?
 Step 3
Apply your paint to the fabric. Drip, splash, immerse, paint, swirl, flick, spray. It doesn't matter. The paint is going to move on the surface of the fabric. You want to cover the surface well. You will not get an image on fabric that does not have paint. You will typically get a better image from a darker color. Not all colors and brands of paint move the same. For example the pink Pebeo colors will almost certainly not move very far and they will typically leave more color under the object.
 Step 3 cont.
The picture above shows the damp fabric covered with paint. You probably remember your grade school art teacher telling you to use the whole page. That applies for sunpainting as well. It is easy to miss getting paint all the way to the edges of the fabric. There are many reasons for that, some of them good, including being too close to the edge of your plastic underlayment or too close to the piece of fabric next to it. I usually start with a piece of fabric slightly larger than my final goal just to be sure I have an evenly coated surface. Yes, you can use one color. Yes, you can use more than one color. Just keep your old color mixing lessons in mind. The paint will move and mix together. You will get lovely blends. You can get unlovely muddy colors if you are not careful.
 Step 4
Place objects on the surface of the fabric. Plant material is fantastic but any waterproof object will work. Make sure the objects are pressed against the fabric. Thick waxy leaves will tend to ripple and have gaps. Softer leaves and younger leaves tend to wilt onto the fabric which gives a good impression. Notice in the picture above that the grasses are not laying flush with the surface. You may use small rocks or glass decorator beads on top of the leaves to hold them down or in place if it is windy. NOTE: Be careful choosing plant material to avoid poisonous plants. Do not strip any plant or tree of all of its leaves. Please be respectful of your environment.
 Step 5
 Step 5
Allow your fabric 'sandwich' to dry in the sun. In the picture above you can see how the flower and the leaves have wilted on to the fabric. The grasses have already been removed but you can compare the impression left by the grasses with their placement in the
 Step 6
Remove your objects and prepare to be amazed.

Step 7
Heat set the fabric following the manufacturer's instructions. If you are using plant material you will want to wash your fabric after you heat set it. You want to make sure that any pollen or potential allergens are washed away before you create with your new fabric.
Update. Sunpainted items are available in my shop. http://waggonswest.etsy.com
Monday, November 21, 2011
Spud 3 Cooks: Tilapia, Green Beans and Potatoes
Spud three made dinner last night and it was fantastic!
I wend looking for something to cook and found tilapia fillets and green beans in the freezer. I went to the computer and searched for "tilapia green beans recipe". The first recipe to pop up was for Breaded Tilapia with Seasoned Potatoes and Garlic Green Beans.
I got busy so when Spud 3 came looking for dinner, I handed him the recipe. It is pretty complicated but he did it.
The startling thing about this recipe is that it 'fries' the breaded fish in foil packets. I was very skeptical but it worked.
A few notes about the recipe.
45 minutes is way too long to bake the fish. Next time we will stop and check after 30 minutes.
Oil the foil all the way around. The fish didn't stick to the bottom of the packet but it did stick to the top where it got flattened too much.
If you like potatoes you will want to increase the amount! They are yummy enough that doubling the recipe is probably a good idea.
Spud 3 has a strange (to me) dislike of frozen vegetables. He loves fresh and canned but not frozen. The recipe calls for fresh or frozen green beans. He insisted on using canned. It worked. Well it worked except for the confusion between teaspoons and tablespoons. The Tablespoon of minced garlic in the beans was a bit much, but it really wasn't as overwhelming as it might have been, particularly when the beans were mixed into the potatoes.
We will definitely be trying this again together and separately.
Thursday, November 17, 2011
Light Blogging/Heavy Lifting Ahead

The real world has caught up with me. I will be doing all sorts of goofy things between now and Sunday, so there won't be much in the way of writing here. I leave you with this picture of metal scrap pulled from our rivers and streams last April to give you an idea of what I might be up to.
Wednesday, November 16, 2011
Upcycling: Scarves and Necklaces Made from T-shirts

Update: If you are looking for instructions on how to make these necklaces, you can start here!
The Iron Craft Challenge this week is to make something for the holidays, including gifts. I've been making scarves by upcycling old t-shirts. This one is a ruffle scarf made from a sunprint misprint. Crazy thing took 36 hours to dry and didn't leave any impressions.
 This one is a string or infinity scarf with a t-shirt flower. It is the one I made as a gift for some one who reads the blog. The cool thing about these scarves is that you just cut strips out of the t-shirt and stretch them until they curl up. Once you have enough, you tie them together with another strip of t-shirt and you have a necklace or light scarf to wear. It can be worn long or wrapped around depending upon the size of the t-shirt you started with. I cut strips from the sleeves to make matching necklaces.
 I do have to find a better way to photograph these. It is a gloomy day so the light isn't as good as I would like but it is also hard to find a way to display them. I tried doing the picture in the mirror. You would have laughed histerically to see me trying to take pictures of me wearing them! I'll have to work on that.
Homemade Marshmallows
My last post reminded me of the one candy I can make reasonably well these days, Marshmallows. I started making these a number of years ago when one of the spuds came across a recipe for them and challenged me to make them. I read a lot of different recipes and techniques and this is the one that makes the most sense.
For a number of years, I made these for a friend who's birthday is in early December. Perhaps I'll get out the candy thermometer and send her a batch.
Homemade Marshmallows
Sift together 1/2-cup powdered sugar and 1/3-cup cornstarch. Set aside.
Line a 9×13 inch glass pan with aluminum foil. Spray the foil lightly with cooking spray. Dust with some of the powdered sugar/cornstarch mixture. Set aside.
In the heat resistant bowl of your mixer sprinkle two packets of unflavored gelatin over 1/2 cup of cold water. Set aside.
In a deep heavy saucepan stir together:
1-1/2 cups sugar
1-cup corn syrup
1/2 cup water
1/4 tsp salt
Cook together over medium high heat until sugar is dissolved. Use a pastry brush (one of those sporty new silicone ones is great) and some cold water to brush down all the crystals from the sides of the pan. Set aside the brush and your stirring spoon and insert your candy thermometer. Boil syrup until it reaches 240 degrees Fahrenheit.
With your mixer running on it’s lowest setting slowly pour the hot sugar over the dissolved gelatin. Once it in incorporated increase the speed and beat until it is very thick, fluffy and white. This takes a long time. We beat at high speed for 15 minutes. (There is some controversy over whether to use a whisk or a paddle beater. We used the whisk and it worked fine, but I am going to try the paddle next time as it seemed to get almost too stiff for the whisk to continue to do much good.) Add 1 Tablespoon vanilla and mix in well.
Spread mixture into prepared pan. Let stand uncovered over night. Turn out onto a cutting board dusted with powdered sugar/cornstarch. Cut with a pizza wheel into squares. Lots of recipes call for using a knife dipped in warm water. I found that just made the marshmallows stickier and it too more powdered sugar to coat them. The pizza wheel gets sticky but I kept shaking some sugar right over the sticky residue and kept going. It worked great. Dust all the cut edges with powdered sugar/cornstarch and let stand for a few more hours to make sure the outsides are dry. Store at room temperature in a sealed container. (Or zipper bag… ours are doing fine on the counter.)
***This is a partial re-post of a recipe pasted here as part of my ongoing attempt to collect all my recipes from the far reaches of the internet and store them in one handy, search-able location.
Tuesday, November 15, 2011
Temper, Temper, Chocolate!
When I was in junior high, my sister registered the two of us for a candy making class. When we arrived, they weren't going to let me stay because I was too young. Somehow my sister convinced them that I would be a good student. I guess I was because I don't remember any complaining after that.
It was an all day marathon of everything from fondant to molding to dipping chocolate. Everyone went home with a huge box of the candy we worked on all day. I got the hang of molds and dipping and rolling fondant. I was either too nervous around the hot candy to get the fondant making part or perhaps the instructors were too nervous to have me around it.
I never did get the hang of proper tempering. It has to be heated and cooled in a fairly precise manner. My last effort left the chocolate worse than before I started (and no, I didn't get water in it!) My most vivid memory of the day was the chocolate hardening on my fingers! (This was back in the day when you could touch food.) The room had to be cool to make chocolate and my fingers were so cold that the chocolate caked on them instead of melting off. Fine chocolate is supposed to melt at body temperature.
I still make candy every now and then. I mostly try to mix in things that disguise the poor tempering. I was reminded of this class by O Wise Sister in her discussion of chocolate for the buckeyes a few days ago. I wish she lived close enough so we could have another candy marathon!
Monday, November 14, 2011
Make Mine Monday Soup: Cheesy Potato Soup
No picture today and not much of a recipe but a quick road map to cheesy potato soup.
Even though it is still pretty warm around here and it was a bright sunny day, the wind was whipping the leaves around like it was clearing a path for the first snow. It made me want to sit down with a thick bowl of soup and dip in some crusty bread.
Of course it was also a day for working and playing at muckety mucking. I stitched head bands and badges all day until it was time to go to the swanky reception at the post old money club. Yeah, they let me through the doors once a year for a reception. If you weren't invited and given a map there is no way you would ever know the place even existed. It is a gorgeous old barn that has been polished and shined and upgraded to a very posh place for a reception.
I wasn't really in the mood for a soiree. I did my schmoozing, traded business cards, made connections and bailed out. By the time I got home I just wanted my soup. Of course there was no such soup awaiting. I had to make it up... So here is what I did.
Fried a handfull of pre-cooked bacon pieces (for salads) in the bottom of the soup kettle. (Burned the first batch and started over.) Added a small amount of chopped onion to the new batch in the clean kettle and sauteed until the onion was soft. Allowed the bacon and onions to drain on a plate.
Added a box of chicken stock to the kettle. Added a bunch of cleaned and cubed redskin potatoes. I added then until the stock in the kettle was pretty much full of potatoes. Brought it to a boil and cooked for about 15 minutes until the potatoes were soft. Added the bacon and onions back in. Took about 2 cups of shredded cheddar. Mixed in about 2 tablespoons of flour and stirred it all together until the cheese was coated with flour. Added the cheese flour mixture to the boiling (should have been simmering) soup stirring until each batch was melted and mixed in.
Went to the fridge to find the sharp cheddar I just bought. Dropped the big tub of yogurt I just bought onto the floor where it proceeded to open and spray me and everything else in sight with COLD yogurt. Trust me, cold yogurt from knee to toe is not fun. Called the spuds to help clean up the mess while I cleaned up me. Caught the soup just before it burned because no one was stirring it or remembered to turn down the burner while cleaning up the mess. Added some of the finally found sharper cheddar. Probably about 1/2 cup shredded. Stirred it in. Stirred in about 1/2 cup heavy cream. Added pepper. Allowed to simmer while setting table. Sliced bread and ate. A surprising yummy soup for a day better left behind.
Matchbook Notebooks: A Discussion of Techniques

I am doing a craft show at an elementary school. This one is for the kids in the school. It is to give them a chance to buy gifts for their family and friends. I like that idea. I've been told that the things that sell the best are under $10. My little badges are inexpensive and should do OK, but I wanted to have a few more things that I could make easily, sell for a dollar or less and then gift or donate if they are left over.

These little matchbook notebooks are all over the internet. There are lots of tutorials and believe me, I have looked at lots of them. Most of them seem to work on a very slim margin of error. A margin of error that is too close for my limited skills. I ended up getting out the sheets of card stock and scrap paper and the paper cutter and working out what fits with the least amount of waste.
I have two sizes that work so far. One has sheets of paper that are 4 by a scant 3 inches. They fit into a strip of card stock that is 9 x 3 inches. I found that by cutting the pages a hair narrower, I was better able to fit them in and make it look good. If they were the exact same size, even the slightest variation in width would allow some to show. The smaller ones have pages that are a scant 2 x 2.5 inches long while the card stock is cut to 2 x 5.5 inches.

I use one of my quilting rulers and the edge of a pair of scissors to score them. I found that holding the pages in one hand and the stapler in the other let me center the staple better than trying to keep it all on the table.
I am using my old collection of stamps on the covers. I thought they looked too plain with the simple colored card stock. I have settled on a variety that I hope will appeal to the kids as well as to the parents. I have had some luck using scrapbooking paper with the smaller sized notebooks. you can just see the camo one in the bottom of the first picture. That should give me enough variety without having to purchase a single thing for this project! Yay for stash-busting.

Now, all I have to do is figure out a price for these that makes it worth my time to make them. I'm open to suggestions.
Sunday, November 13, 2011
I Can Do That With Six Ingredients!

Make That Bread!
OK, I don't know if anyone even knows that game anymore but it kept running through my mind as I was preparing potluck food this morning.
I found a recipe on the internet for pumpkin corn bread. It sounded really good, but it had a whole lot of ingredients, some if which were not to be found in my pantry. If you've ever seen my pantry, heaven forbid, you would understand that that is actually saying quite a bit. I tend to have more than the usual staples on hand.) I did go get a couple of things when I was close to Global Foods yesterday. I kept putting off making it and figured I would save the idea for later.
Last night was the lock-in for the spuds at church and with it an opportunity for some adult conversation. So I stayed late rather than come home for solitary cooking spree. This morning started slow and then the spuds needed a ride and, and, and. One thing leading to another I found myself with an hour to go until the potluck, nothing prepared to take and a taste for pumpkin cornbread in my head. So, I improvised.
2 packages of Jiffy Mix corn bread mix
1 tsp pumpkin pie spice
1 15-ounce can pumpkin
2 Tablespoons honey
3 eggs
2/3 cup milk
Preheat oven to 400 degrees Fahrenheit, Heat a small amount of butter, about 1 tsp, in a cast iron skillet. Lightly whisk the pumpkin pie spice into the Jiffy mixes in a large bowl. Whisk together the pumpkin, honey, eggs and milk. Gently stir into the dry ingredients until just mixed. Pour into the hot skillet. Put in the oven and bake for 25-30 minutes until the center is set and the top is slightly golden.
See... I can make that recipe with 6 ingredients. All of which happened to be in my pantry or fridge. And the ladies asked for my recipe. That means it must be good. Therefore, this will be cross-posted on the church recipe blog.
*Now, this recipe is really a matter of do as I say rather than do as I do. You can see a smear of pumpkin and some clumps of cornbread mix in the picture above. That is because, in my haste, I dumped it all in the bowl together and stirred until it looked mostly mixed. I obviously missed some clumps and lumps. Mixing the wet ingredients separately will eliminate that problem.
Saturday, November 12, 2011
Grandma's Recipes: Buckeyes
 As written:
Buckeyes
1 pkg. pow. sugar
1 stick oleo
1 1/2 c. peanut butter
2 tsp vanilla
roll in balls
1 lg pkg semi sweet chocolate chips
1/2 block paraffin
melt
_____________
2 2/3 cups powdered sugar is a lb.
These are little round confections about an inch in diameter. The center is peanut butter, sugar and oleo (margarine). From the note at the bottom, one would interpret the package of powdered sugar to be a 1 lb box. While I recall a bit of peanut in these, I doubt she used extra crunchy. They were too smooth to have a lot peanut chunks in them. Soften the margarine. Stir or mix all of the ingredients together. Roll into balls. Very straight forward.
The little balls of peanut filling are dipped in melted chocolate. Using paraffin, from the same box you used to make your ice cube candles, was pretty standard at the time. I imagine it was used to make the available chocolate in the form of chips set up better. I also imagine using it avoids most of the problems associated with not tempering chocolate properly. I think they sell some kind of paraffin-like crystal at most cake/candy shops to serve the same purpose. You may still see paraffin as an ingredient in some lower quality chocolate bars in the candy aisle.
The peanut balls are usually held with a toothpick and dipped into the chocolate leaving a small circle of the peanut showing, This gives these candies the distinctive look of a buckeye. A big hit with fans of the OSU buckeyes.
Update for O Wise Sister!
Yes, I do remember that it needs to be tempered. I just never remember exactly how to do it properly.I don't think they had access to good chocolate and the only grocery store version would have been choc. chips. They remove most of the valuable cocoa butter butter from them and they are not designed for making candy. Someone figured out that adding some paraffin would help it set up and hold up. As far as I know, paraffin is not known to be harmful to humans - look at all those wax lips and wax bottles we chewed on!The alternative would be to go to Michaels or Hobby Lobby and get some candy-making chocolate, melt it carefully and dip the peanut butter centers. It would be so much better. Of course, there is really good chocolate, too - a little harder to find and much harder to use as it must be temered (you remember that from class?)
Friday, November 11, 2011
Thank You Gentlemen and Ladies
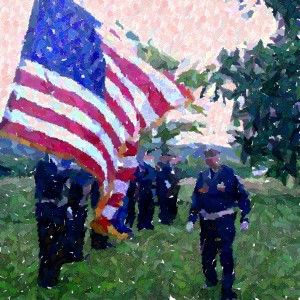 We sleep safely in our beds because rough men stand ready
in the night to visit violence on those who would do us harm.
— George Orwell
Wednesday, November 9, 2011
Halloween 2011: Alice Costume
 Each year we go to the most amazing Halloween party thrown by some fantastic friends. The food is endless, the drinks are creative, the decorations are unbelievable, the scavenger hunt is cut-throat and the costume contest is serious business. I mean serious business. Folks (we) are already planning our attire for next year!
This year we didn't have a lot of ideas, but we did have the hats left over from the Croquet with the Red Queen set. We decided that we would go with the Alice in Wonderland theme. The picture above is the Alice costume. What follows is a sort of tutorial for making your own. Unfortunately, I was making this on a short time line so I didn't take any process pictures. Hopefully the construction pictures will suffice.
To make the skirt.... I used the least expensive blue cotton fabric I could find at the local fabric store. I originally planned on making the skirt and constructing the blouse from scratch so I bought 4.5 yards. For the skirt I cut two sections of fabric approximately 28 inches long.
 With the selvages together, I measured in 8 inches on each cut end. You can see from the diagram above to measure in from the selvage on one side and from the fold on the other. Then draw a straight line from the two points. You should have a diagonal line across the fabric as you can see in figure A above. Cut through both layers of fabric along that line.
You will end up with one large trapezoid on the fold side of the cut and two smaller almost triangular trapezoids with a straight edge along the selvages. If this were a real skirt and not a slap dash costume, I would cut the selvages off.
Sew the two smaller trapezoids together along the straight (selvage) edge as indicated by the arrow in figure B.
Now sew the two trapazoids together along one of the angled sides. Keep the short ends together at the top and the longer ends at the bottom.
Repeat these steps for the other 28 inch piece of fabric. Sew the two pieces together along each side to create a big tube. Again, keep the short ends at the top and long ends at the bottom.
Press the seams open. Turn the top (short edges) under 1/4 inch and press. Turn it in an inch and press. Sew right along the turned under edge to make a casing. Be sure to leave an inch long gap in your sewing at some point along the seam.

I didn't have any elastic but I do have a bunch of hem bits from cutting up t-shirts. I threaded one of those through the casing to make a secure drawstring. The advantage of the t-shirt hem was that it could be pulled through but it was thick enough and had enough texture that it didn't untie slip around too easily so the skirt stayed in place.
 Hem the skirt as much or as little as you like. I simply zigzagged the edge and never got back to turning it up or stitching it. The skirt as finished hung loosely and didn't stand out as much as a little girl Alice skirt should. I didn't want to make a petticoat and no one wants to wear tulle under a costume when you know you will be running around like a lunatic on a scavenger hunt. So I simply pleated about two inches of fabric and stitched about two inches parallel to the hem in several spots. I did it about 18 inches up on all of the 'straight' seams and about 12 inches up on all of the angle seams. (I just guessed where the straight seam should have been on the big trapezoids and put the pleat there.) It isn't rocket science. Just pleat it until you get the fullness you want.
The blouse. As I mentioned earlier, I was going to modify a pattern that I had. However, I scored big while I was out thrifting for materials for another project. I found a shirt that would fit in almost exactly the same shade as the skirt fabric... for $1! No pattern tissue to fold. No button holes to make. Yay! I did have to modify it so that it looked more like the the little girl Alice we were going for.
 I started by cutting off the collar leaving the neck band behind. I did not bother tearing out the seam. I simply cut as neatly as I could above the stitching line. I used the collar piece I removed to make a pattern for the replacement.
My electronic drawing skills are not the best, but hopefully you can get the idea from the picture above. Figure A is the collar piece that was cut off. Figure B roughly shows the addition of the rounded corners on the new collar. I drew circles over the existing points and connected them with a curve. I left about 1/2 inch of the original collar on the pattern to match up with the neckband when I sewed it back on I also extended about 1/2 inch on each side for a seam allowance. Cut two pieces. Sew them together around the curved edges leaving the neck band side open. Clip. Press. Turn.

Top stitch about a quarter inch in from the edge to finish it and help it lay flat. Then just line it up with the neck band on the shirt and stitch it down. As you can see from the first collar picture I pinned the new collar inside the existing neckband exactly the way it would finish out. I then stitched once close to the edge of the cut side of the neckband. I stitched it again just above the open/cut edge of the collar seam securing those edges to the neckband. You can see that if you look closely on the inside of the collar in the picture above. You can also see one of the collar buttons from the original shirt peeking out from underneath the modified collar on the left hand side.

I did a similar thing for the sleeves. I cut the sleeve off at the seam. Again, I left the seam with the shirt and cut carefully up against it. Since they were long sleeves. I cut it off at the elbow. Open up the underarm seam. Now you have your basic pattern.

To get a puffed sleeve, I cut the 'pattern' in half down the middle as shown on the line in figure A. I then added about 3 inches between the two pieces, carefully marking each side of the split. Cut two sleeves.
Gather the sleeve between your markings. Sew the underarm seam. Fit the new sleeve right sides together with the sleeve opening on the shirt. Adjust the gathers as needed to get a full puffy looking sleeve. I concentrated most of the gathers near the top of the sleeve. Sew it down.
Repeat with the other sleeve.

Hem the bottom of each sleeve. You can make a casing as you did with the waistband of the skirt and thread elastic through it. If you remember, I didn't have any elastic handy so I simply put an inverted pleat at the end of each sleeve and stitched it down along the hem-line. You can see that in the picture above. It gave the impression of a puffy sleeve.
 The apron was a simple thing to make. Unfortunately, I didn't take any measurements as I was working so you are going to have estimate on your own. I actually had a piece of muslin that had practice pleats on it so I started with that for the bottom. I rounded the bottom corner and did a simple rolled hem all the way around. I then cut two rectangles of muslin, stitched them together on three sides like a pillow case. Trimmed the corners. Turned it an pressed it. I stitched that right sides together in the center of the pleats. The side ties were strips of muslin about 8 inches wide. I folded in the long sides about 1/2 inch and pressed them. I then folded them in half and pressed again. I used the selvage edge up against the bib of the apron and folded the strap over the gathered edge of the apron skirt. I pinned it down well and then stitched from the bib to the end of the strap along the open edge. Repeat on the other side. I reinforced the junction between the bib, tie and skirt with a line of satin stitching.
  The upper straps were folded and iron just like the waist ties. They were stitched along the open edge. An end of each was attached to the top of the bib on the inside. Again I used a bar of satin stitching to reinforce the connection. The neck straps just tie behind the collar but you could easily measure them and attach at the waistband crossing them in the back.Add a blond wig, a strip of blue fabric for a head band, white socks, black shoes and you have Alice!
Tuesday, November 8, 2011
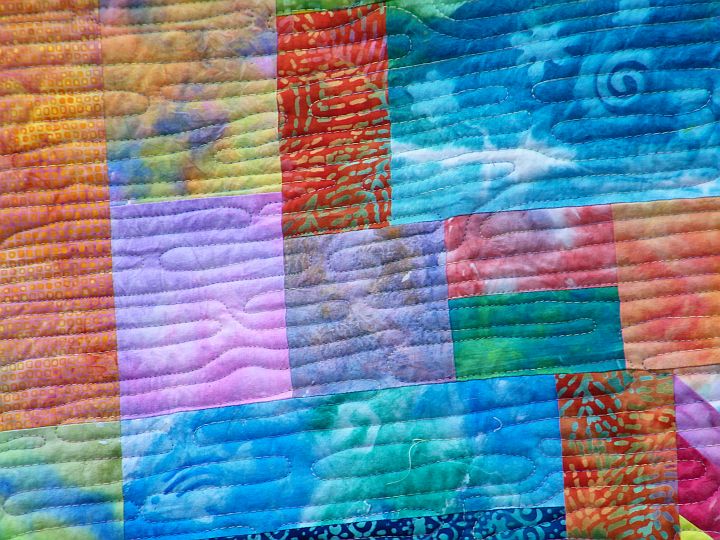
A Quilt for My Brother
 Here is another quilt I haven't blogged about. It was made for my brother on the occasion of his earning Full Professor. Quite an accomplishment. I started his quilt well before the celebration. I had purchased several fabrics that were pretty staid, but appropriate. I used printed fabric photos left over from another project.
I made the first few blocks and became stalled out completely. I didn't have a plan or a clue how to make a crazy quilt. I just started sewing fabric onto the photos until it got to be kinda, sorta big enough. The problem was that I did not have enough different fabrics. I had to go back to the stash and the store and find more fabrics. The spuds got into the act. They started finding all sorts of fabrics that would work perfectly, or in some cases, totally annoy the monkey's uncle.
 Once I had enough different fabrics, I still didn't have a clue, but I kept going with the basic plan and was able to finish it out.
Here you can see some of the quilting and some of the fabrics. The sock monkeys were perfect. There is a red tractor fabric in the center. The monkey's uncle is a red tractor kind of guy so the abundance of green tractor fabric was no help at all.

The pumpkins are a long story, as are most when talking about the monkey's uncle. Suffice it to say I do my best to bake him a pumpkin pie every October. Of course I try to find the strangest version of pumpkin pie, but again, that is another story for another blog.
 Here you can see the whole thing. You might notice the one little picture with the broccoli frame. Again, perfect. There are also some raccoons, corn and dinosaur bones.
The quilt is a a good sized wall hanging. It has a hanging sleeve on the back. The quilting was done by Terri at Feather Touch quilting. She did a fantastic job with a very difficult quilt. I'm sure she had several, there is no way I can quilt that out moments with it. All of the blocks are randomly pieced and there are some decorative stitch elements around some of the photos.
Quilter Question: Honey Bun?
I have one honey bun in a fabric line I love. I've made other things from the fabric I started with but now I have a few scraps and one honey bun. What can I make with it? I'd love some suggestions.
Monday, November 7, 2011
Slime Mold Quilt

This quilt is fondly referred to as the slime mold quilt. I made it for the Mini Art Quilt Swap 4 on Craftster. My partner had a picture on her wist from a Scientific American website. I was unable to chase it down further than that and so I really don't know what the image is. For lack of any better description, I started referring to it as the slime mold.
 You can see the original image printed on the label for the quilt.
I was looking for my post about it and realized that I never did blog about this particular project.

The background fabric was hand painted to try and replicate the colors of the original image. The black slime mold body is a quilters cotton.

It was fused using raw edge applique and stitched with a blanket stitch. I used a machine stitch in silver/gray on top of that. In the picture above you can also see some of the hand embroidered accents and some of the beading using during quilting.
 Some of the details were added using sequins, beads and embroidery.
This picture was taken just after the quilt was basted. You can see some more of the embroidery details as well as some of the machine quilting.
 The center section and some of the details were hand quilted. The center was done using Pearl Cotton in a seed stitch. For the hand quilting I used a variety of metallic and embroidery threads.
The rest of the post is just more pictures of my little slime mold quiltie. I had so much fun making it that I want to share every little detail.


Entered into the Weekly Quilting Contest at Quilting Gallery! June 22, 2012.
en
Subscribe to:
Posts (Atom)